-40%
MPPT Solar Charge Controller 12V 24V 36V 48V WIFI Mobile APP Control 40A 60A
$ 103.48
- Description
- Size Guide
Description
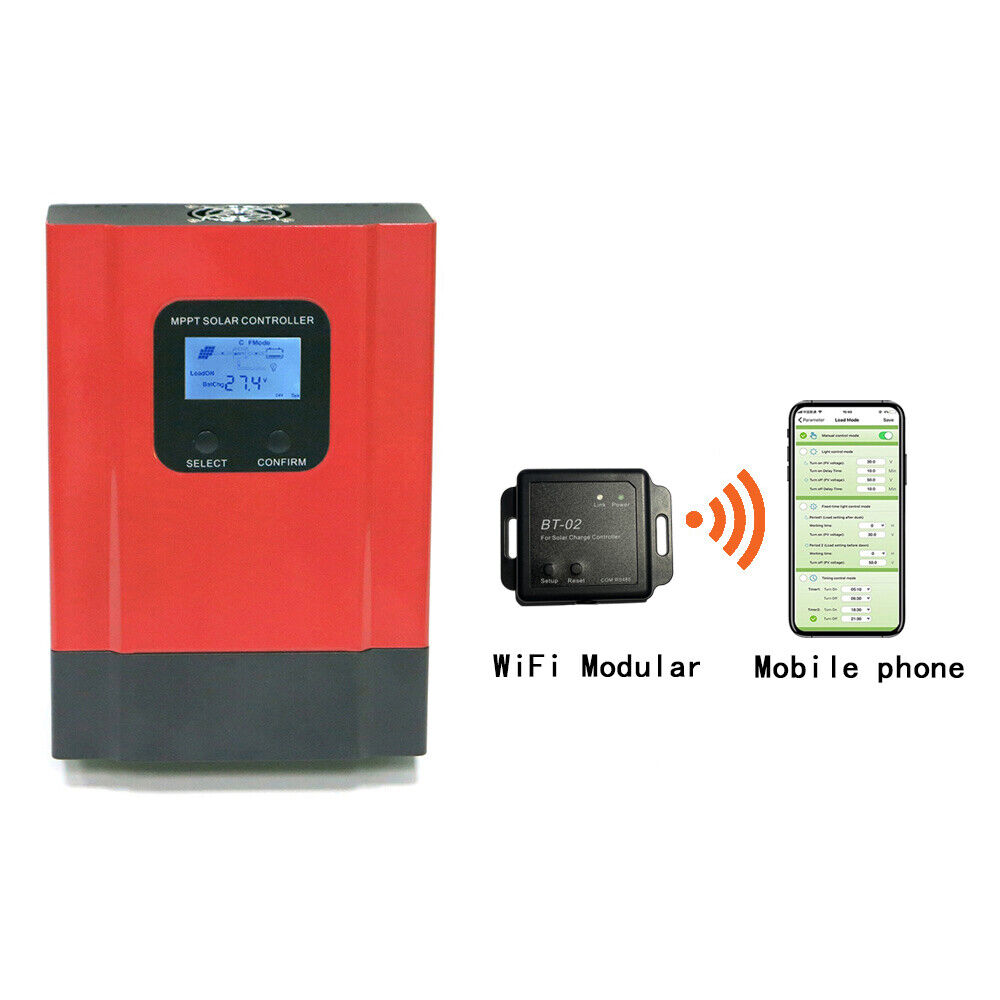
MPPT Solar Charge Controller DC12V/24V/36V/48V Battery Charger Regulator 40A 60AIntroduction:
eSmart3 series is third generation of eSmart mppt controller, based on eSmart series mppt controller, we update the display, control method,
connect way, internal structure etc. It features an efficient MPPT control algorithm to track the maximum power point of the PV array. Greatly
improve the utilization of solar panel. Its intelligent LCD and upper PC display, mostly convenient for customers to check, records and parameter
setting. Widely used in solar off-grid system of telecommunication base station, household system, street lighting system, field monitoring system, etc.
System Voltage: DC12V/24V/36V/48V automatic recognition
Rated Current:40A 60A
Maximum PV(voc) Voltage: 150V
Features :
Advanced MPPT control algorithm, MPPT efficiency ≥99.5%,Machine conversion efficiency up to 98%;
DC12V/24V/36V/48V battery system automatic recognition,user can use it in different system conveniently ;
Maximum PV input voltage up to DC150V ;
3-Stage charge: (constant current, constant voltage, floating charge), to extend the battery life ;
Discharge mode: ON/OFF mode, PV voltage control mode.
Users can choose 4 kinds of commonly standard batteries(Sealed lead acid,Vented, Gel, NiCd). Other kinds of batteries can be defined by users ;
Most information could be provide by LCD like: model No., PV input voltage, battery type, battery voltage, charging current, charging power, working status and so on. Also customer's information like company name, website and logo can be added into Solar Eagle software.
RS485 communication, we can offer communication protocol also, it’s convenient for user’s integration management.
CE,ROHS,FCC certifications approved.We can help clients to approve other certifications.
2 years warranty, and 3~10 years extended warranty service also can be provided
Parameters Display & Setting information:
LCD display information
Set the battery type and LOAD control mode
Parameter:
MPPT eSmart3-12V/24V/36V/48V Series
40A
60A
Charge Mode
MPPT(Maximum Power Point Tracking)
Charge Method
Three stages:constant current(MPPT),constant voltage,float charge
System type
DC 12V/24V/36V/48V
Automatic reconition
System voltage
12V system
DC9V~DC15V
24V system
DC18V~DC30V
36V system
DC32V~DC40V
48V system
DC42V~DC60V
MPPT efficiency
>=99.5%
Input Characteristics
Max.PV input voltage (VOC)
12V/24V/36V/48V system
150V
Start the charge voltage point
12V/24V/36V/48V system
Hhigher than current battery voltage 5V
Low input voltage protection point
12V/24V/36V/48V system
Higher than current battery voltage 3V
Over voltage protection point
12V/24V/36V/48V system
150V
High voltage recovery point
12V/24V/36V/48V system
145V
Rated PV power
12V system
520W
780W
24V system
1040W
1560W
36v system
1560W
2340W
48v system
2080W
3120W
Charge Characteriestics
Selectable Battery Types (Defaut Gel battery)
12V/24V/36V/48V system
Flooded ,Sealed lead acid,Gel battery (other types of the batteries also can be defined )
Constant Votlage
12V/24V/36V/48V system
Please check the charge voltage according to the battery type form
Float Voltage
12V/24V/36V/48V system
Rated charge Current
12V/24V/36V/48V system
40A
60A
Temmperature Compensation
12V/24V/36V/48V system
-3mV/°C/2V(default)
Output Discharge Characteristics
Low voltage output protection point
Default 10.5V;Recovery 11V;It can be adjustable.
Load rated current
40A
60A
The ouput control
On mode,Off mode,PV voltage conrol mode,PV&Time control mode,Time control mode
Display
LCD display
System type,PV voltage ,Charge voltage,Charge current ,Charge power,temperature ect.
PC software
RS485
PC system for solareagle
Windowns 7,8,10
Protection
Low voltage input protection
yes
Over voltage input protection
yes
Over charge power protection
yes
Low voltage output protection
yes
Rated output current protection
yes
Temperature protection
yes
PV and Battery revserse connection protection
yes
Other Parameters
Noise
=<40dB
Thermal heat-dissipating method
Fan cooling
Physical
Measurement DxWxH(mm)
240*168*66
270*180*85
Package size DxWxH(mm)
289*204*101
306*210*120
Mechanical Protection
IP21
Operating Temperature
-20°C~+50°C
Storage Temperature
-40°C~+75°C
Wifi- Modular Function :
Brief introduction of working mode:
Two type of working modes:
1. WIFI hotspot routing mode, Access Point(referred as
AP mode
below), In this mode , Cloud-Box-M1 acts as hotspot,
allowing other wireless terminals devices access and providing data access;
2.The wireless terminal mode, Station (referred as
STA mode
below), Cloud-Box-M1 can be connected to the router WIFI
hotspots, but itself does not accept wireless access.
Usage of Key instructions:
Exit/Default Press: Click on button --- Switch to AP/STA mode
Long press for 6~8 seconds---To STA mode, making Cloud-Box-M1 enter to STA pending state(Reset the password of router set in last time)
--To AP mode, reinitialize firmware after updating
Reset press: Reset switch.
Status indicator of working mode:
When restarting the power or pressing the Reset button:
If the “signal“ light will continue to shine for 10 seconds, then flashing, it means working in AP mode.
If the “signal” light flashing immediately, it means working in STA mode.
The steps of configuring in AP mode:
1.Ensure Cloud-Box-M1 under AP mode.
2.Search WIFI hotspot--”MyGreen-Solar-XXXX”in mobile, with the password “88888888” to connect the hotspot.
3.Open APP in Mobile or Pad and come to home page, click on the "AP mode" in the upper- left to enter the monitoring center.
The steps of configuring in STA mode:
1.Ensure Cloud-Box-M1 under AP mode
2.Connect to the router hotspot on mobile
3.Make sure the Cloud-Box-M1 in the signal range of router.
4.Once Cloud-Box-M1 configured, with hotspot click on the "LAN search" to search device; under4G(or cellular) or connected to hotspot, click on the “Qr code scanning” scan Qr code of Cloud-Box-M1 to search device.
5.For the first configuring, open APP in Mobile or Pad and come to home page, click on the “Menu” in the top right, then click on the “Add Device” to input password. After pressing “OK” to confirm, go ahead to search all the “Cloud-Box-M1” device in the signal range of router. Once matched, click on the “Back” in the upper-left come back to home page, choose the right one from the list to enter the monitoring center.
Manage the list of device:
On the home page,For IOS version, swipe left and right to manage the list , select “Editor” then “Rename” working. selecting “Share QRcode” to Share the QR code of the current device; click on the “Delete”, deleting the current device information.(For Android version, long press the device needed manage in the list, and then appear a list read “Rename”,”Share QRcode”, “Delete”.)
Notice:
1. Our Esmart3 MPPT Controller now can use with Mobile APP , you can buy WIFI Modular with us to use with Mobile APP , if you need, please contact with us .
2.If you want to connect PC/Laptop,you need to buy an RS485 communication cable.If there is no Communication cable,it`s only can be work for AGM,Flooded,Sealed Batteries.
3.Please be sure your solar panel input voltage is higher than 18V when you charge 12V battery , and your PV Input Votage more than 30V when you charge 24V battery bank , and your PV Input Voltage more than 60V when you charge 48V battery bank .
4.For this mppt solar charge controller , you need to connect with battery first , then connect with the solar panel . Because this solar charge controller , the power is supplied by the battery , so no matter day time or night time , if this solar charge controller is connected with battery , it will be on all the time when it is turn on .
5.
If your battery is lithium battery , please tell us the work voltage range of your lithium battery , then we will adjust the voltage range of our MPPT Solar charge controller to meet the work voltage range of your lithium battery .
6. If the system need to connect with the inverter , please connect the inverter directly to the battery , and do not connect with the load port of the controller . You can only connect the stable DC load , like Bulb or other stable load ( the output wattage of the appliances are stable ) to the load port of the controller .
Package including:
1.1PCS MPPT solar charge controller
2.1PCS English User Manual
3.1PCS Temp. Sensor
4.2pcs Hang Bracket
SHIPPING :
We ship out goods by DHL or FEDEX or TNT or UPS or EMS fast express shipping way to international.
Items are shipped within 1~3 business days after receive cleared payment.
FEEDBACK
Note: Do not hesitate to talk with us anytime before and after the purchases, we are committed to your 100% customer satisfaction.
I am here and ready to assist you with any question or concerns you might have before or after the purchase.
If you have the problem with the power inverter, please talk with us first with eBay message BEOFRE you open return request or file a dispute or leave the netural or negative feedback.
Any question will be replied within 24 hours except the weekend and statuary holiday in Chinese Beijing Time.
My goal is to make sure you are happy and having the pleasant shopping with us.
